


Tutorial originally featured in Making Magazine No.8/Forest 2019
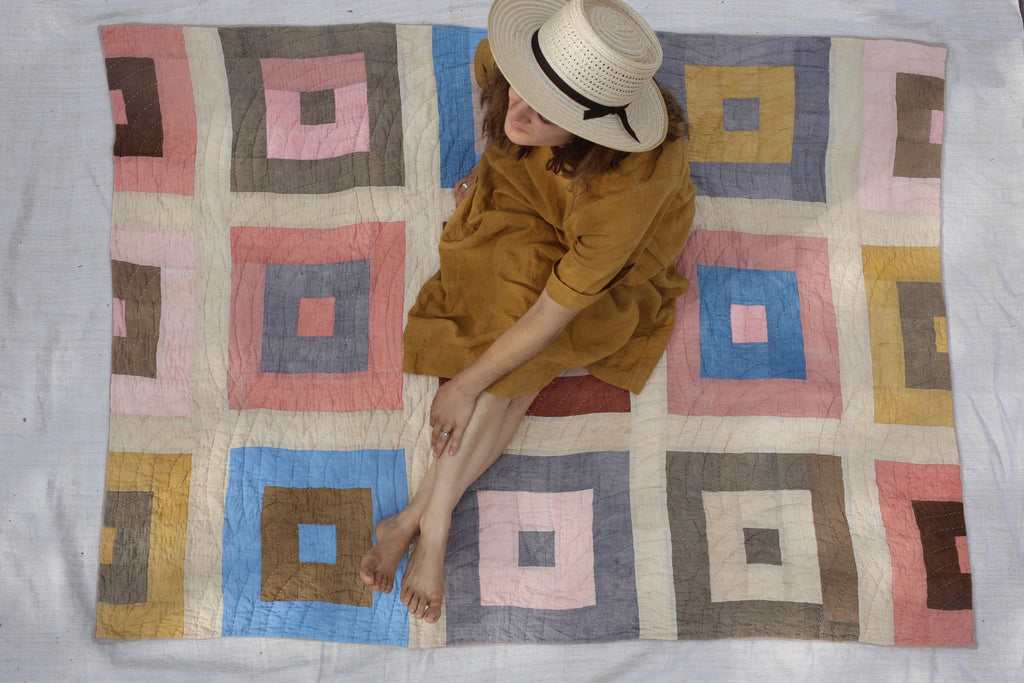
When the weather welcomes me outside and the plants are at peak harvest I begin the natural dye process. The plants I collected to make the colors in this quilt are: fresh from the tree pecans (brown), just fallen acorns (tawny brown), red onion skins (light reddish tan), cutch (deep red brown), madder roots (earthy pink), Osage wood shavings (bright yellow), and indigo (clear blue). You can buy fabric that matches these naturally dyed colors, or dye your own fabric.
Hand-dyeing Fabric
For the dye process start by filling a large vessel with fresh water and adding the dye stuff, then heat the water to extract the color from the plant matter. After approximately 60 minutes of simmering the dye bath, when the water is rich with color, strain the plant material and add fabric that has been prepared with a mordant.
Working with the rhythm of the seasons your fabric shelves eventually become a library of colors that soon offers a rainbow of options. Using naturally dyed fabric ensures a harmonious color palette that pleases the eye.

Sewing
To make this simplistic log cabin quilt cut 4 inch wide strips from six different colors of khadi cotton (gauze-like cotton) or fabric of your choice. You will need to make twelve 17 inch quilt blocks, three of the quilt blocks will be cut in half, they will be placed at the top and bottom of the quilt. Each colorful quilt block will be bordered with 4 inch wide strips of off-white (un-dyed) fabric.
Finished Measurements
Approximately 58" wide x 84" tall
Supplies
- ½ yd each (3 yds total) of six different colors of fabric 100% cotton khadi
- 1 ½ yd of 44" wide; 100% cotton off-white khadi for the borders around each block
- 1 yd of fabric (your color choice) for the binding
- 2 ½ yds of 60” wide fabric for backside of quilt, or 5 yds of 44” wide fabric, cut in half and sew together to account for the width.
- Cotton or wool batting
- Gridded quilting ruler
- Rotary cutter and mat
- Glass head pins
- clover fabric marking pencil for drawing lines to hand quilt
- 100% cotton off-white sashiko thread
- Sewing machine
- Iron
- Machine sewing needle
- Sashiko needle
Notes
Use 1/4" seam allowance throughout, unless otherwise noted.
Prewash all fabrics.

Cutting Instructions
Using aquilting ruler, rotary cutter, and cutting mat, cut the following pieces:
Cut each ½ yard colored fabric into 4 inch wide strips. You may want to cut only a few strips at this time of each color to create a few blocks, and then revisit how you would like to proceed with your colorful blocks. Creating an equal amount of each of your six chosen colors or selecting more of one color than another.
Cut the entire 1 1/2 yards of un-dyed off-white fabric into 4 inch strips
Cut the 5 yards for the backside of the quilt
Sew
- To create a quilt block choose a color to be the center piece of the block and cut a 4” square, place it on your work table. Select another color that complements the center square and place the strip on the colored square, right sides together and sew. Sew along one long edge of the square, flip strip over, press. Continue adding the coloredstrips around the colored square, creating a border around the colored square. Finish the block by sewing strips of the center square color around the square, creating an alternating color scheme: center, boarder, center. Once all strips have been added the complete the blockwill be made of3 nesting squares. Create 12 blocks in your desired color combinations, alternating between color center squares andborers.
- Arrange the colorful quilt blocks into your desired pattern. It should be 3 blocks wide and 4 blocks tall, with the 4th block cut-in-half to create the top and bottom rows.
- Stitch each row of blocks together by sewing an off-white strip between the blocks. Press the seam allowances open.
- Stitch each of the rows together, by sewing an off-white strip between the rows. Press the seam allowances open.
- Lay the quilt backing with the wrong side (WS) facing up. Place the batting on top, and then add the quilt top, RS up. Secure the layers with safety pins (or by basting).

- Using a basic running stitch, quilt the three layers as desired. To create the fan pattern for hand-stitching, make a template with cardboard or clear plastic by punching 10 holes in a row every 2 iches, use a fabric pencil to hold the first hole in place and with a second pencil mark your design by fanning half circles, working from left to right. Mark your lines on the front of the quilt both before you stitch and as you stitch (if needed). When using sewing thread, use a sewing needle. When using Saskiho thread, use a Sashiko needle. Once the quilting is completed, trim the edges (all 3 layers flush: top,batting, back) by hand with sharpe fabric scissors so that the quilt sides are straight, your corners are at 90 angles, and your quilt is symmetrical. It will measure close to 58" x 84".

Making Binding
Sew the 2½" [6.4 cm] wide strips from any color fabric that matches the quilt into one long strip, to create the binding for your quilt. Lay the ends of two of the strips RST and perpendicular and overlap them. Mark a diagonal line across the overlapped pieces of fabric from corner to corner and pin to keep in place. Check before you sew that the sewing line is in the right place and will create a continuous strip of binding with a diagonal seam. Sew. Cut excess fabric at the seam to leave a ¼" [6 mm] seam allowance. Continue with the other strips until you’ve got one long binding strip. Iron the seams open, then fold and iron the strip in half with WST.
Bind
- Pin the binding to the front of your quilt in the middle of one of the sides, aligning the raw edges of the binding with the quilt edge and leaving a 6" [15. 3 cm] tail of binding. Begin sewing using a ¼" [6 mm] seam allowance.
- When you reach the first corner, stop sewing ¼" [6 mm] away from the corner and backstitch. Trim your thread tails. Fold the binding up at a 45-degree angle and back down again to create another fold aligned with the top edge of the quilt; pin. Start sewing at the top edge using a ¼" [6 mm] seam allowance, sewing over the fold you just created and continuing along until the next corner. Repeat this process on each corner, working around all four sides of the quilt.
- When you get back to where you started, stop sewing 6" [15. 3 cm] from your beginning stitches, leaving a second unsewn tail. Fold the tails to meet in the middle of the unsewn space and press with an iron or finger press, making sure there is a visible crease on each tail. Open the binding strips, match up the crease marks, and pin strips RST. Sew along the crease mark to join the binding strips together, then trim and press the seam allowance open. Fold the binding strip WST again and align the raw edges of the binding with the edge of the quilt. Sew the remaining binding section to the quilt.
- Press binding over the edge of the quilt toward the back and hand-sew the binding to the back of the quilt using a hem stitch or tunnel stitch, your choice. As you reach each corner, fold the bottom binding edge up and the side edge over to create a mitered corner.

Photo from Making Magazine by Carrie Bostick Hoge & Ashley Yousling from